Are you frustrated with those subtle inward curves on the sides of your hips, often called hip dips? You’re not alone.
Many people feel self-conscious about hip dips, but here’s the good news: you can effectively target them with a workout routine right from the comfort of your home. Imagine feeling more confident in your favorite jeans or loving the way you look in your summer outfits.
With a little dedication and the right exercises, you can start seeing changes that not only enhance your appearance but also boost your self-esteem. Keep reading to discover a simple yet powerful hip dip workout plan that fits seamlessly into your daily routine, requires no fancy gym equipment, and promises noticeable results. Don’t let hip dips hold you back any longer – take the first step towards a more confident you!
What Are Hip Dips?
Hip dips are the inward curves along the sides of your hips. Simple exercises at home can help tone these areas. Focus on squats, lunges, and side leg lifts for effective hip dip workouts.
Understanding the term “hip dips” can be quite a revelation, especially if you’ve ever wondered about those inward curves below your hip bones. These are common and completely normal, but they can sometimes be a source of insecurity. While some people embrace their natural shape, others look for ways to tone and smoothen these areas. Hip dips, also known as violin hips, are the inward curves on the side of your body just below the hip bone. They are a natural part of your body’s structure, largely determined by your bone structure and muscle distribution. Imagine standing in front of a mirror and noticing that your hips don’t form a perfectly smooth line from your waist down to your thighs. That small indent is your hip dip. Some people have them more pronounced, while others might barely notice them. This variation is totally normal. It’s similar to how some people have dimples when they smile, while others don’t.Why Do Hip Dips Occur?
Hip dips are primarily due to the shape of your pelvis and the distribution of muscle and fat in your body. This is largely genetic, meaning you inherit these traits from your parents. Your body stores fat in different areas, and the curve of your hip dip is influenced by how your muscles and fat are distributed around your hips and thighs. Working out can help in building muscle around this area, potentially reducing the appearance of dips, but it won’t eliminate them completely because they’re part of your skeletal structure.Can You Get Rid Of Hip Dips?
The idea of getting rid of hip dips isn’t about erasing them completely but rather about toning and strengthening the surrounding muscles. Exercises like squats, lunges, and leg lifts can help. These workouts focus on building the gluteus medius and minimus, which can enhance your hip shape and improve overall body symmetry. It’s important to remember that embracing your body’s natural shape is key. Fitness isn’t just about changing how you look but also how you feel.How Can Hip Dip Workouts Boost Your Confidence?
Engaging in hip dip workouts at home can be a great way to boost your confidence. You’ll notice improved strength and toning in your lower body. As you progress, you might find that your clothes fit differently, and you stand a little taller, feeling proud of the hard work you’ve put in. Have you ever completed a workout and felt an unexpected surge of energy and positivity? That’s the power of exercise, affecting not just the body, but the mind too. Remember, fitness is a journey, and every small step counts. So, start your hip dip workout today and celebrate every milestone along the way!Benefits Of Hip Dip Workouts
Strengthening the muscles around the hips enhances balance and stability. Hip dip workouts boost confidence by shaping curves naturally. Exercising at home allows convenience and privacy, making it easier to stay committed.
Are you tired of feeling self-conscious about your hip dips? You’re not alone. Many people are looking for ways to tone and strengthen their hips from the comfort of their home. Hip dip workouts can be a game-changer. Not only do they help in sculpting your hips, but they also offer a multitude of benefits for your overall well-being.Improved Strength And Stability
Building strength in your hips can significantly enhance your stability. Imagine walking confidently without the fear of stumbling. Hip dip exercises target the gluteus medius and minimus muscles, which are essential for balance. You might notice improved posture and a more secure stride.Enhanced Muscle Tone
Want to see a visible difference in your hip area? Hip dip workouts help you achieve that toned look. Simple exercises like side leg lifts or bridges can lead to more defined muscles. As these muscles develop, the appearance of your hip dips can improve, giving you a boost of confidence.Boosted Flexibility
Flexibility is not just for dancers or athletes. It’s crucial for everyday activities. Hip dip workouts can increase your range of motion. You might find it easier to bend and stretch without discomfort. Improved flexibility can also prevent injuries, making everyday tasks smoother.Convenience Of Home Workouts
Not everyone has time for the gym. Home workouts offer the convenience of fitting exercise into your busy schedule. No need for fancy equipment; a mat and some determination are all you need. Plus, you can avoid gym fees and crowded spaces, making workouts stress-free.Personal Satisfaction
Seeing progress can be incredibly satisfying. As you commit to your hip dip workout routine, you might notice changes in your body and mindset. There’s nothing quite like the feeling of achieving your fitness goals. Have you ever felt proud after completing a challenging workout? That sense of accomplishment can be a powerful motivator.Motivation To Stay Active
Once you start seeing results, staying active becomes easier. Hip dip workouts can be a stepping stone to a healthier lifestyle. You might find yourself more eager to try new exercises and explore other fitness avenues. How does it feel to be enthusiastic about your health journey? Don’t let hip dips hold you back. With these benefits, home workouts can be a rewarding addition to your routine. Why not give it a try and see how it transforms your fitness journey?Essential Equipment
Working out at home is convenient. Hip dip exercises require minimal equipment. With just a few items, you can target your hip dips effectively. The right tools can enhance your workout.
Resistance Bands
Resistance bands are versatile. They come in different strengths. Choose one that suits your fitness level. Bands help in muscle activation. They add resistance to your hip dip exercises. Portable and easy to store. Great for stretching and toning.
Dumbbells
Dumbbells are essential for strength. They add weight to your workout. Start with light weights. Gradually increase as you gain strength. Dumbbells help in shaping your hips. They also improve your overall muscle tone. Easy to use at home.
Yoga Mat
A yoga mat provides comfort. It offers a non-slip surface. Essential for floor exercises. Protects your joints during workouts. Adds stability to your movements. Easy to clean and store. Perfect for a home workout setup.
Warm-up Routine
Starting your hip dip workout at home with a proper warm-up routine is crucial. It not only preps your muscles but also reduces the risk of injury. A well-rounded warm-up can set the tone for an effective workout session.
Dynamic Stretches
Dynamic stretches help increase blood flow and loosen your muscles. Begin with leg swings to awaken your hip joints.
Follow it up with some arm circles to loosen your shoulders. Remember, the goal is to prepare your body for movement, not to push it to its limits.
Ever noticed how athletes sway their arms and legs before a race? They do it to get their bodies ready for action. Try adding five minutes of dynamic stretches. You’ll feel more agile and ready to tackle your workout.
Activation Exercises
Activation exercises target specific muscle groups and get them firing. Start with glute bridges to engage your glutes.
Feel the squeeze at the top to ensure your muscles are activated. Next, try some clamshells to fire up those hip abductors.
Do you struggle to feel your glutes working during exercises? Activation exercises can change that. They’re like a wake-up call for your muscles, ensuring they’re ready to perform.
Investing time in your warm-up might seem unnecessary, but the benefits are worth it. You’ll find your workout more effective, and your body will thank you for it. So, what’s your favorite warm-up move?
Targeted Exercises
Hip dips are natural indentations on the sides of your hips. Some people wish to reduce their appearance. Targeted exercises can help tone this area. These exercises strengthen the hip muscles. You can perform them at home without equipment.
Side Leg Raises
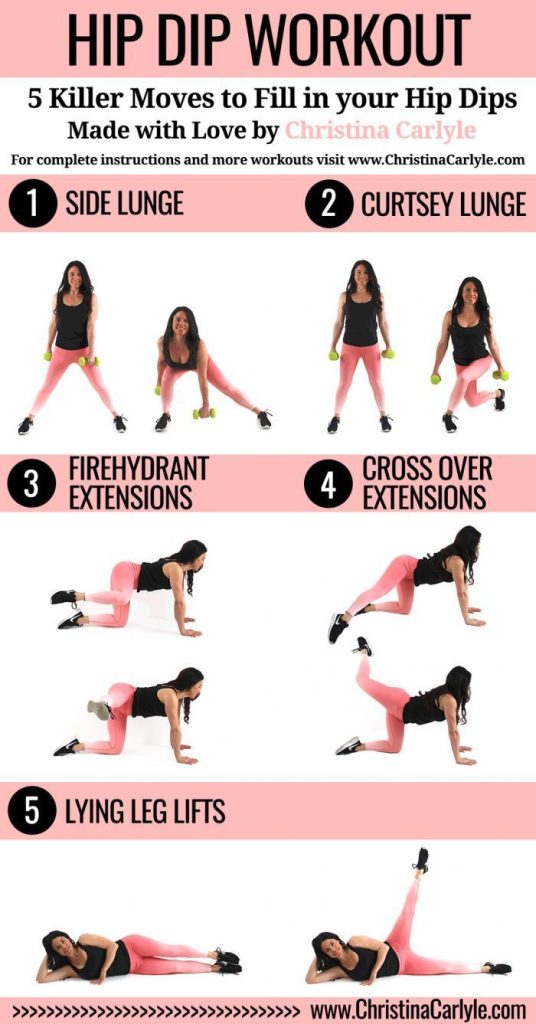
Side leg raises are simple and effective. Lie on your side. Keep your legs straight. Lift the top leg upwards. Hold for a moment, then lower. Repeat this several times. It helps strengthen the hip muscles.
Curtsy Lunges
Curtsy lunges work the glutes and thighs. Stand tall with feet shoulder-width apart. Step one leg back diagonally behind the other. Lower your body into a lunge. Keep your chest up. Return to start and switch sides. This exercise also enhances balance.
Fire Hydrants
Fire hydrants target the outer thighs and hips. Start on all fours. Keep your back straight. Lift one knee out to the side. Keep the knee bent. Lower it back down. Repeat on the other side. This exercise helps build hip strength.
Clamshells
Clamshells are great for the hip area. Lie on your side with knees bent. Keep feet together. Open your knees like a clamshell. Squeeze the glutes as you do this. Slowly close the knees. Repeat for a set number of reps. It helps improve hip stability.

Credit: www.pinterest.com
Full Body Workouts
Full body workouts are great for toning muscles and improving strength. They engage multiple muscle groups, offering a balanced fitness routine. For those with hip dips, these exercises can help. They focus on the hips, thighs, and core. With regular practice, you might notice a more even body shape.
Squats
Squats are a staple in full body workouts. They target the glutes, thighs, and hips. Start by standing with your feet shoulder-width apart. Lower your body as if sitting back in a chair. Keep your chest up and knees behind toes. Return to standing. Do 10 to 15 reps for best results.
Lunges
Lunges are effective for strengthening the lower body. Step forward with one leg, lowering your hips. Keep your front knee above your ankle. Push back to the starting position. Alternate legs for a balanced workout. Aim for 10 reps on each side.
Plank Variations
Plank variations strengthen the core and stabilize the hips. Begin with a basic plank on your forearms. Keep your body in a straight line. For a challenge, try side planks or plank jacks. Hold each position for 30 seconds to a minute. Increase time as you get stronger.
Cool Down And Stretch
Hip dip workouts at home benefit from a cool down and stretch routine. Stretching helps muscles relax and improves flexibility. Regular cooling down after exercise aids recovery and reduces soreness.
After an intense hip dip workout at home, cooling down and stretching can make a world of difference. These practices not only help in preventing injuries but also aid in muscle recovery. Cooling down can be as critical as the workout itself, bringing your heart rate back to normal and enhancing flexibility.Static Stretching
Static stretching is essential for releasing tension in muscles post-workout. Hold each stretch for at least 20-30 seconds to maximize its effectiveness. Focus on areas like your hips, thighs, and lower back. Sit on the floor with your legs extended, reaching for your toes. Feel the stretch in your hamstrings. If you’re unable to reach your toes, don’t worry—just reach as far as you can comfortably. Another effective stretch is the seated butterfly stretch. Bring the soles of your feet together, letting your knees fall to the side. This stretch targets the inner thighs, which are often engaged during hip dip exercises.Foam Rolling
Foam rolling is a fantastic method for self-massage, easing sore muscles. Roll slowly over the foam roller, focusing on tight spots. It’s like giving your muscles a gentle massage after they’ve worked hard. Start with your glutes and slowly roll towards your lower back. You might feel some discomfort, which is normal; it indicates a tight spot needing attention. You can also target your IT band by lying on your side and rolling from your hip down to your knee. This might be challenging initially, but with practice, you’ll find it incredibly beneficial. Have you ever noticed how much lighter your body feels after these cooldown exercises? Investing just a few minutes in stretching and foam rolling can enhance your workout results. Next time you finish a hip dip session, make sure not to skip this crucial step. Your body will thank you!Tips For Effective Results
Discover effective hip dip workouts at home to shape your hips. Focus on exercises like squats, lunges, and side leg lifts. Regular practice ensures noticeable results.
Getting those hip dips in shape doesn’t require a gym membership or fancy equipment. With simple exercises and dedication, you can tone your hips right at home. But how do you get the most out of your hip dip workout? Here are some tips for effective results that will keep you motivated and on the right track.Consistency
Consistency is key to seeing changes. Make your workout a regular part of your routine. Set specific days and times for your exercises, and stick to them. Think of it like brushing your teeth; you wouldn’t skip it, so don’t skip your workout. Celebrate small victories to keep the momentum going. Maybe it’s holding a plank a little longer or doing extra reps. Acknowledge these wins and let them fuel your determination.Proper Form
Proper form is crucial to avoid injury and maximize results. Focus on quality over quantity. It’s better to do fewer reps correctly than to rush through them with poor form. Use a mirror or record yourself to check your posture and movements. This feedback can be invaluable in correcting mistakes. Like when I noticed my knees weren’t aligned during squats, making a small tweak improved my balance and effectiveness instantly.Balanced Diet
Don’t underestimate the power of a balanced diet in your fitness journey. Your muscles need fuel to grow and repair. Include lean proteins, whole grains, and plenty of fruits and vegetables in your meals. Hydration is equally important. Keep a water bottle handy and sip throughout the day. Are you eating foods that support your workout goals, or are there adjustments you need to make? Think of your body as a car; without the right fuel, it won’t perform at its best. Your diet is the fuel that keeps your workouts going strong. — By focusing on consistency, proper form, and a balanced diet, you can make significant strides in your hip dip workout. What changes will you make to ensure success? Your efforts can lead to results, so start today and commit to your journey.Tracking Progress
Achieving visible results in your hip dip workout at home requires consistent effort. Track progress by recording exercises and repetitions. This helps identify improvements and areas needing focus, making workouts more effective and rewarding.
Tracking progress in your hip dip workout routine is crucial to stay motivated and ensure effectiveness. You’ll want to see how your hard work is paying off, right? Knowing where you started and how far you’ve come helps you fine-tune your exercises and achieve better results.Measurement Techniques
Begin by measuring your hips with a tape measure. Place it around the widest part of your hips. Record these numbers to track changes over time. Don’t forget to measure both sides. This helps identify any asymmetries and address them with targeted exercises. Keep a record in a journal or a digital app. It’s handy to have these numbers accessible for comparison over weeks and months.Progress Photos
Taking progress photos is a powerful motivator. Snap photos every few weeks to capture your journey visually. Use good lighting and a neutral background. Wear similar clothes in each photo for consistency. Look back at these photos regularly. They provide a clear picture of your progress, beyond just numbers. Have you ever noticed the subtle changes that numbers can’t tell? Photos reveal the transformation in your body shape and confidence. Tracking progress is more than just about numbers and images. It’s about celebrating the small victories and staying motivated. How do you plan to track your progress?
Credit: greensafaris.com

Credit: www.kobokofitness.com
Frequently Asked Questions
Can Hip Dips Be Fixed With Exercise?
Exercise can’t completely fix hip dips. They are natural bone structures. Exercises can improve muscle tone and appearance. Focus on glute and thigh workouts to enhance curves. Embrace your body’s uniqueness.
How To Do A Hip Dip At Home?
Perform hip dips at home by doing exercises like squats, lunges, and side leg lifts. Use resistance bands or dumbbells for added intensity. Aim for 3 sets of 10-15 repetitions per exercise. Maintain consistency and correct form to see effective results.
Always warm up before starting your workout.
Can I Get My Hip Dips Filled In?
Yes, you can fill in hip dips with cosmetic procedures like dermal fillers or fat grafting. Consult a certified professional to explore options, costs, and potential risks. These procedures aim to create smoother and more contoured hips. Always prioritize safety and effectiveness when considering such treatments.
Is It Normal For A 13 Year Old To Have Hip Dips?
Yes, it’s normal for a 13-year-old to have hip dips. Hip dips are a natural body shape. They result from bone structure and fat distribution. Everyone’s body is unique, and hip dips are common in many people regardless of age.
Conclusion
Achieving toned hips at home is possible with consistent effort. Simple exercises can make a big difference. Focus on routines that target hip muscles. Consistency is key for noticeable results. Take your time with each exercise. Listen to your body.
Avoid overworking muscles. You don’t need fancy equipment. Just space and dedication. Enjoy your workout journey. Remember to maintain a balanced diet. It supports your fitness goals. Stay motivated and track your progress. Celebrate small victories along the way. You’re on the path to stronger, more defined hips.
Keep up the good work!